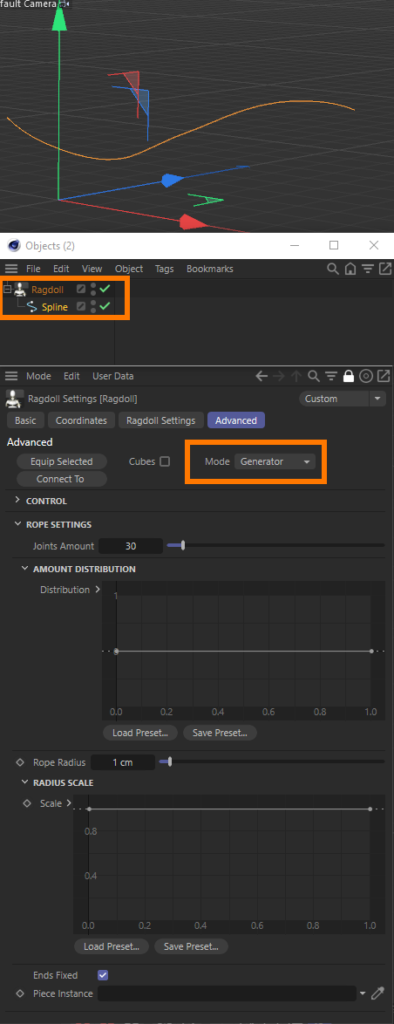
This page describes how the “Generator” mode in the Advanced Tab works.
This mode is the best decision for all chained-type objects, like: rope, tank track, dreadlocks, snake body, etc. Also using the Generator mode, unlike other modes, we can connect non-joint objects (native maxon’s Ojoint type).
Basically the Generator mode works with the Spline object (see right).
Draw the spline, hold Alt, create the Ragdoll plugin instance.
Now you are ready to create the Rope.
When you hit the Equip Selected button, the Ragdoll plugin will generate the structure covering the provided spline. This structure consists from the Sphere and Cone (next “joint-piece”), Connectors in the Ragdoll mode which connect each neighbor joint-pieces, Dynamic tags on the each joint-piece. Also the Ragdoll plugin creates the Tracer object, which traces the joint-pieces path, and generates a new spline, you can use it later for a Sweep object.
This structure now works like a fully dynamic rope.
The Settings of its physic engine you can find in the Project Settings/Bullet.
The physic engine here is a Bullet engine.
This rope interacts with all Rigid Body objects, Connectors, receives collisions from another scene objects, translates collisions to another objects. The new Cinema 4D rope physics (new in R26 and 2023) works faster but does not able to do something of this.
F.e. new rope in Cinema 2023 does not allow to hang a character (ragdoll) on this rope
The Spline #
You can use any spline form. You can use Closed and Opened splines. The Spline can have a single segment or few segments.
Also you can modify the Spline form and see the changes of the created Chain interactively.
Rope settings #
Joints Amount #
Joints Amount – creates the exact amount of joint-pieces along the Spline length.
It is the main parameter of the chain precision. 10 joints works faster but but gives less accurate form. 1000 joints gives very accurate form but works slower.
Combine this setting with the Project Settings/Bullet/Expert/ “Steps per Frame” and “Maximum Solver Iterations per Step”.
For example if you see that your heavy object stretches your rope too much, you can fix it raising the “Steps per Frame” from the 15 to 50.
Amount Distribution #
Amount Distribution – helper parameter for a Joints amount. Use this spline parameter to distribute the joint-pieces along the Spline object without changing their amount (don’t confuse a spline parameter and a Spline object).
For example, your rope will be tied into a knot in its center. Your task will require more joint-pieces where your rope will form a knot and less where they are less necessary. Using this parameter you are able to shift more joint pieces to center of Spline object and leave less joint-pieces on rope sides.

Rope Radius #
Rope Radius – sets the constant radius of the piece along the Spline object.
Radius Scale #
Radius Scale – sets the different radius of the piece along the Spline object.
For example, open this spline parameter, set its left point to 0 by x and 0 by y and the right point to 1 by x and 0 by y. It will set the all rope radius to zero. Now create the third point in the middle and set it to 0,5 by x and to 1 by y. You will receive this:
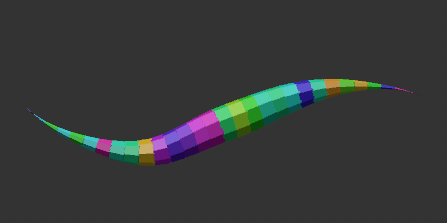
By the way now even if the ends are fixed, the joint-pieces have no any mass and as the result will not be fixed. Thus, you can form the breaks in the rope.
Ends Fixed #
Ends Fixed – if enabled, creates controllers on the sides. The first and the last joint pieces will set as their child objects. Also now these joint-pieces are added into the “Selected joints“-field from the Main-tab. If you will raise the Follow position and rotation there, this joint-pieces will follow controllers position and rotation.
You can manually add as many controllers like this as you need. Just don’t forget to add these joint-pieces into the “Selected joints“-field in the Main-tab.
Usually is not needed because it is better to use the Connector (Connect to function) to reliably fix one dynamic object to another. But for quick test is helpful.
Piece Instance #
Piece Instance – except the Sphere and Cone objects you can use your own objects. Create your piece-object, selecting it create its Instance object, put this Instance object in this field. Now this object will be cloned along the Spline. Now you can work with the original piece: modify its form, size, topology etc to get the correct structure.
Is good for Tank track.
Still use all the settings from the Advanced Tab Control group. You can change the mass, use the follow position and rotation parameters, select the joint-piece of the Rope and f.e. Hand-joint of the character and push the Connect to button. The rope will become connected by this piece to a character’s hand.


