This tab is used as a powerful animation tool to rig fingers, tails, faces and all other possible body-parts.
This tab allows you to create connectors, colliders and physics tag for exact joint-chain(s).
Here you can create the Ragdoll for any creature or mechanism step by step.
Basically, here you can see two main buttons: “Equip selected” and “Connect to”. Everything in this tab revolves around the selection in the Viewport/Object manager and one of these buttons.
For this function to work correctly, it is preferable to attach the mesh of the object you are working with to a plugin. Please do this via “Retarget menu” in a previous tab. This step is not necessary. Several internal algorithms will process your character anyway and find the mesh for a correct work, but if it does not, you are free to perform this step.
In everything else the “Advanced”-tab is fully independent from a “Ragdoll settings”-tab.
For example it is not necessary to attach the character bones in a “Retarget menu” of previous tab.
“Equip selected” button. #
This button processes the selected bone-chain in the selected Mode (described below). For example, you have the creatures tail, human finger, spine, etc. This button turs it into the physics chain.
You are free to:
* select few/multiple bones/bone-chains and process it all at once. When you select only the root of the chain and press “Equip“, the plugin will process the whole chain to its end_joint.
* specify chain’s segment in the chain which you need to equip. F.e. you have the chain of tail-bones of 20 bones. You can Equip only 10 bones inside the chain. To do this: select the 5th bone in the segment and the 15th bone. Press “Equip“.
just select it holding Ctrl in Object manager or with Shift in the viewport.
Also you can interactively select in the viewport all bones inside the segment from 5th to 15th bones and equip it.
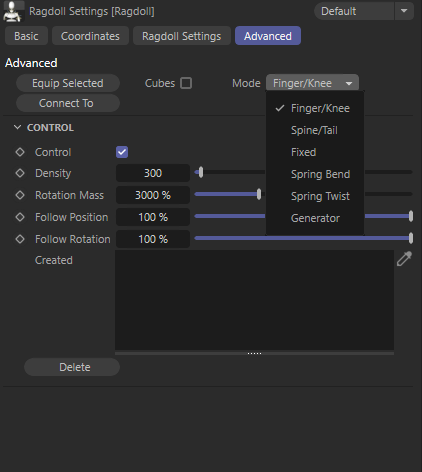
“Mode” list. #
Each mode in the Mode list is a preset of Connectors or Springs that best suits to the named task.
The “Mode” works both with the “Equip selected” and “Connect to” buttons.
- Spine/Tail. This mode is the best for spines, tails, braids and any chains which require not only the bending, but also the twisting along the longitudinal axis. It will create the C4D Connector in its “Ragdoll” mode and will calculate correct angles.
- Finger/Knee. The best for a knee, finger or elbow joints. In this type of joint we don’t need the twisting, moreover, we need to avoid it. So this mode creates the Connector in the “Hinge” mode, which is the best suits for this task.
- Fixed. Creates Connectors in the Fixed mode. The most simple Connector in Cinema 4D.
- Slider. Creates Connector(s) in the Slider mode. Places the Slider between two objects and sets its limits to the current distance between them.
- Spring Bend. Dynamic Springs in Cinema 4D work like muscles. Linear spring mode of the spring works to bend and unbend joint. In the Ragdoll Plugin you can equip and connect joints with a Cinema 4D dynamic Spring in the “linear” and the “angular”(below) modes separately. The current pose will be stored. During the simulation these joints will tend to the pose. Play with the force of springs to achieve the best result.
- Spring Twist. Connects selected joints by a Spring in Angular mode. Keeps the twist angle of joints (along their longitudinal axis).
Due to the nature of Cinema 4D find the created Twist Spring under the selected bones. The Bend Spring will be created under the Ragdoll plugin instance.
- Generator. This mode generates rope-like structures. This mode has its own logic described on its page.
All modes except the Generator works only with the object’s type of Ojoint i.e. Cinema 4D “Joint” object. If you need to connect another types (f.e. Cube or Sphere) use Generator.
“Connect to” button. #
This buttons specially designed to connect one selected joint to another selected joint. Or – few selected objects or chains to the last selected.
Works like: “connect A to B”, where A is the object/objects which you selected and B is the last selected object.
F.e. you’ve already created the chain described in the previous step. If you will play animation you will see that the equipped finger or a tail does not follow the another character’s structure or scene object. Now you need to connect this chain to another object in the scene which will drive whole chain. Select the root bone of the chain and then select the target object. Push the button. Now the Connector (or Spring) is created. It connects the first selected object(s) with the last selected object using selected Mode.
Every time when “Connect to” pressed – the last selected bone matters. You can connect few chains to some object simultaneously. For example four fingers to a wrist. Just select fingers root bones and as the last bone select the wrist bone. The plugin will consider the last selected as a target object for all four fingers.
Cubes checkbox. #
When you generate the structures of colliders, connectors and Dynamic body tags in the Ragdoll plugin you are able to select the type of the Collider. You can chose between the generating a polygon object collider or a cube collider. Sometime each one suits better to your task.
This checkbox works the same as the “Cubes” checkbox in the Ragdoll tab.
Control #
Control – this checkbox enables the control over the ragdoll via a settings below. When enabled settings below will take control via everything created in Advanced Tab.
It works like the main enable checkbox in the Basic-tab of all objects in Cinema 4D, but respectively for only the settings below.
Parameters “Density”, “Rotation mass”, “Follow position” and “Follow rotation” control the corresponding setting in the created Rigid body tags.
Density #
Density – controls the “density” setting in the “Mass” tab in the Dynamics body tag on the every bone which was previously processed.
Rotation mass #
Rotation mass – controls the “Rotation mass” setting in the Dynamics body tag on the every bone which was previously processed.
Two sliders above have a good influence on the physics behavior. Play around with it to get an experience and understand the mass influence for rotation and linear movement of the object.
Follow position, Follow rotation #
Follow position, Follow rotation – we are already familiar with these settings which here have the same influence on the physics as the same settings in the main tab (“Ragdoll-settings”).
Tip: still use the “Selected bones“-field in the “Main” tab for additional level of control. Add any bone (the finger for example) to the “Selected bones“-field using “Add selected” button. Now the Follow position and Follow rotation sliders from the “Advanced” tab (current page describes) will no longer having control of the weight for the finger bone. Now its weight is controlled by corresponding sliders from the “Main” tab.
Tip: create ragdoll for a character in the “Ragdoll-settings” tab. Equip all its additional body parts in the “Advanced” tab. Or create the ragdoll completely in the “Advanced” tab.
Delete button #
Delete button – deletes everything which was created during the work in “Advanced”-tab. It is useful when the result is not satisfy you. You can delete it and quickly create it again. It will not affect the entire ragdoll created in the “Ragdoll”-settings tab.
The horse equipped with an Advanced tab. The spring’s force for legs is 25.


